
Richland College Continuing Education - Course Syllabus
Catalog Course Description: Explore the 3rd Dimension of Digital Imaging using Caligari's latest 3D rendering studio trueSpace. Learn to use textures, bumpmaps and lighting techniques to create photo-realistic scenes.
Resources/Text: Caligari trueSpace 2: 3D Modeling Construction Kit, David Duberman, ©1996
Course Competencies: Upon successful completion of this course, students will have a fundamental knowledge of and hands-on experience with 3D graphic design and animation tools. Students will work in 3D space using X-Y-Z coordinates and multiple views; Add objects to a scene and manipulate the shape of primitives including spheres, cones, cubes, cylinders, etc; Create regular, irregular and spline 2D polygons and build 3D objects from them using several tools and techniques; Use advanced modeling tools such as point editing, slicing, dimensional promotion, dynamic division, object deformation, surface sculpting and boolean operations. Understand object hierarchies and groups. Import or create custom texture maps and apply transparency, bumpmaps and refractive properties to an object. Light scenes and objects using various methods. Render still images and simple animations.
Teaching Methods: Lecture, Demonstration, Exercises
Continuing Education Units: To receive a Certificate of Completion and 2.4 CEU's, a student must attend 90% of the class time and meet minimal course expectations.
The class is divided into six 4-hour sessions:
Session I: College paperwork and introductions; Instructor art and animation show and tell; Examination of the trueSpace interface, tool groups and preferences; Creating and saving a scene; Loading and saving an object; Navigating the interface and using different views; Moving and scaling objects along an X-Y-Z coordinate system; Rendering an object and background; Adding a primitive and changing it's resolution; Creating a regular, irregular and spline 2D polygon; Boolean operations with polygons; Adding text.
Session II: Questions and a recap of some exercises; Creating 3D objects from 2D polygons and text using sweep, lathe, tip and bevel; Editing object vertices, edges and faces; Adding polygons to an object using slice; Separating objects utilizing dimensional promotion; Improving redraw by changing the draw mode; Dynamic division and object smoothing; Object deformation and sculpting; Boolean operations; Lecture topic: Pre-rendering a scene vs. rendering on the "fly" - a question of polygons. (Example: STAR TREK pre-rendered cinematic sequence versus MARATHON 1st person real time action)
Session III: Questions and a recap of some exercises; Rotating object axes and the "look at" utility; Quad divide, smooth quad divide and triangulate polygons of an object; Object hierarchies, creating siblings and children; Assembling a photo-realistic scene using object libraries and objects built in-class; Basic experimenting with texture-mapping, lighting and animation; Rendering options and saving scene to file; Lecture topic: 3D resources and software. What they are and how are they being used (handouts) Demo-CD, 3D Studio Max "Dancing Baby"
Session III Exercise: Build a fully-rendered scene with pre-built models and models built by you (class votes - select scene #1, #2 or #3).
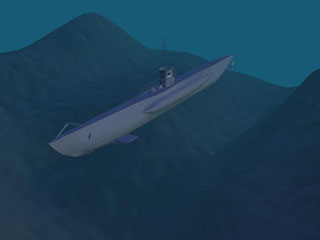
Scene #1: U-boat (build sea floor)
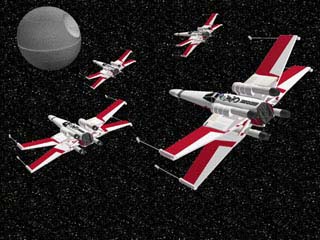
Scene #2: STAR WARS (build Death Star)
Scene #3: TIGER TANK (build street, walls, and rubble)

Session IV: Questions and a recap of some exercises; Lighting, infinite, local and spot; Changing color and intensity of lights; Lighting fall-off; Properties of infinite light; Adding and aiming a spotlight; Adjusting the spotlight penumbra; Casting shadows; Selecting, adding and deleting from the materials library; Paint tools; Shader tools, facet, autofacet, smooth, flat/phong/metal shaded; Adjusting shaders, shininess, glow, roughness, transparency, refraction; Adding texture, bump and environment maps; Procedural textures; UV projection and the material rectangle; Lecture topic: SINKA - a look at some incredible modeling, lighting, and texture-mapping in this 3D multimedia novel.
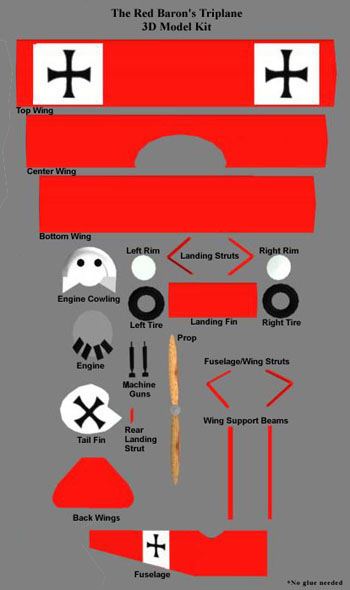
Session V: Questions and a recap of some exercises; Begin working on final project "The Red Baron's Triplane." Model engine cowling, engine, cylinders. Model propellor. Animate and loop propellor blade. Keyframes and frame-rate. Build hierarchy of engine parts. Save engine model to file. Build fuselage, wings, struts, guns and wheels utilizing a variety of modeling tools. Texture map parts and utilize material rectangle to add decals. Load engine and build hierarchy of entire aircraft. Lecture topic: Character animation. VEGGIE TALES video - turning vegetables into cute 3D animated toons and TOY STORY: how they did it and some "little known" production facts (handouts).
Session VI: Finish working on Triplane; Adding a camera and animating a triplane by setting keyframes or creating an animation path; Render scene with background; Rendering an animation to file; Save final work to disk; If time allows: Experimentation with Strata Media Paint or discussion on VRML; Class evaluations and presentation of certificates. Pass out trueSpace 3D demos CD's.
Session V-VI Final Project: Skip Biffman, creative director at Dynamix Games, orders you to build a simple 3D model of the Red Baron's Triplane for an on-line combat game in production entitled ACES OF WWI. Build shapes using the model kit guide and aircraft scenes below as reference - assemble the plane, add colors, textures, and decals, and animate the propellor blade.

Who is the Red Baron's greatest adversary
![]()
Thank you. Keep practicing and good luck!!!
![]()
Dallas College Wrapped SUV and 737
